Crawl Space Vapor Barrier Installation Steps Done Correctly First Time
A damp crawl area can make a clean home feel older than it is. You may notice musty air near the floor, cupped hardwood, soft insulation, or that sour smell that never seems to leave after a rainy week. The right vapor barrier changes that story because it separates your home from the wet ground beneath it before moisture gets a chance to travel upward.
For many U.S. homeowners, this job becomes urgent after a home inspection, termite visit, or summer humidity spike. A house in Georgia faces different ground moisture than one in Colorado, yet the goal stays the same: stop soil dampness from feeding bigger trouble. Strong home maintenance planning starts with knowing which repairs protect the structure, not only the rooms you see every day.
Good crawl space work is not glamorous. That is why people rush it. They toss plastic down, stack a few bricks on the edges, and call it done. Then the plastic shifts, seams open, water collects, and the same smell returns. Done correctly the first time, this project feels less like a weekend chore and more like a quiet upgrade to the whole house.
Why Vapor Barrier Installation Steps Matter Before Any Plastic Goes Down
The biggest mistake happens before anyone opens a roll of poly. Homeowners focus on the sheet itself, while the crawl area is still dirty, uneven, wet, or full of old debris. That is like laying a new rug over a muddy porch. The material may be new, but the surface below is still working against you.
Reading the Ground Before You Cover It
A crawl area tells you what it needs if you slow down long enough to look. Powdery soil, standing water marks, rusted duct straps, sagging fiberglass, and white residue on masonry all point to different moisture paths. Some houses pull moisture from exposed dirt. Others collect runoff near a low foundation wall.
A home in the Carolinas may show damp soil for weeks after heavy rain, while a ranch house in Arizona may only need protection from seasonal ground vapor. That difference matters. Crawl space moisture control starts with diagnosis, not plastic thickness.
Small clues can save you from a wrong repair. If water enters through a foundation vent during storms, covering the soil will help, but it will not solve the entry point. If plumbing drips above the ground, no liner can fix the smell until the leak is repaired. The ground cover handles soil moisture; it does not replace drainage, plumbing, or grading.
Fixing Drainage Problems First
Water should move away from the house before you seal anything under it. Downspouts that dump beside the foundation, flower beds sloped toward the wall, and low spots near crawl access doors can push moisture into the space again and again. Many American homes with older gutter systems fail here because the problem sits outside, not under the floor.
A simple test helps. Walk the perimeter after a hard rain and watch where water slows down. If puddles form beside the foundation, you need grading corrections, longer downspout extensions, or a drainage plan before the liner goes in.
This is where the work gets honest. A clean liner can hide a water problem for a short while, but it cannot defeat gravity. When the soil outside keeps feeding the crawl area, the plastic becomes a bathtub liner instead of a moisture shield. Fix the source first, then cover the ground.
Preparing the Crawl Space for Long-Term Moisture Control
Preparation is where the job either becomes durable or turns into another loose sheet of plastic under the house. The crawl area does not need to look pretty, but it does need to be clean, stable, and ready to hold material in place. This stage feels slow. It is also where most future failures are prevented.
Clearing Debris Without Damaging What Still Works
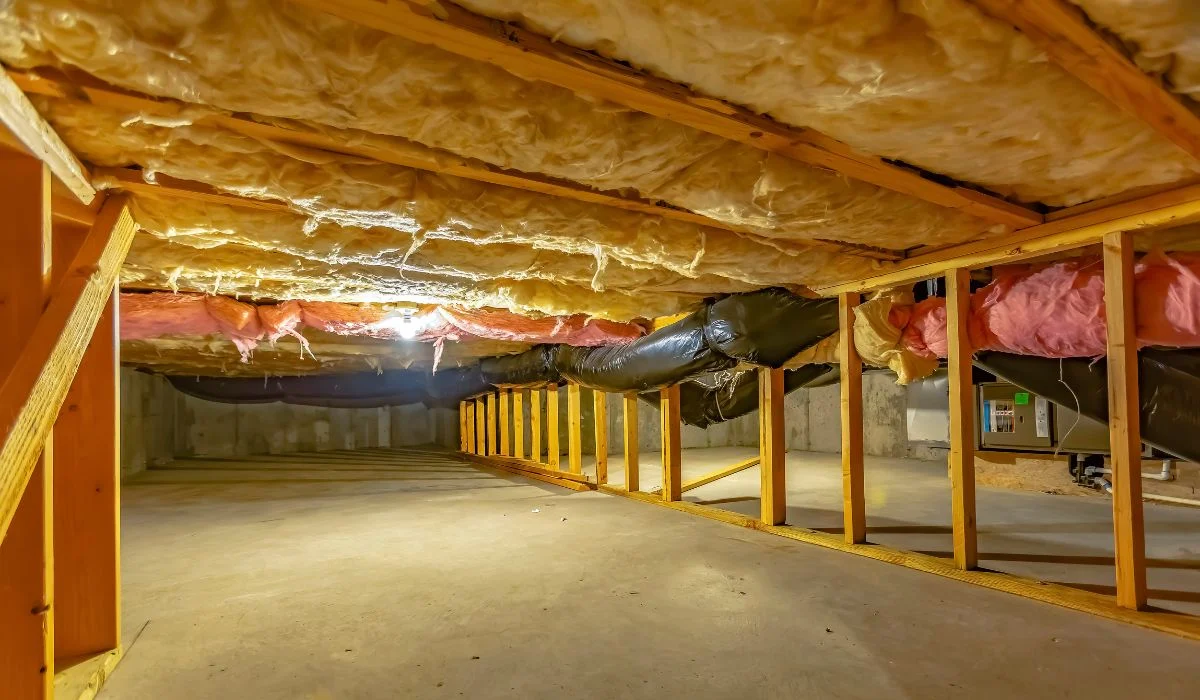
Old insulation, scrap wood, broken masonry, sharp stones, and construction trash can puncture plastic sheeting under house framing faster than most homeowners expect. Even a small tear matters because damp air will find that gap. It does not need a wide opening to start feeding odor and humidity.
Wear gloves, eye protection, and a respirator rated for dust. Crawl areas often contain moldy insulation, rodent waste, rusty nails, or sharp metal straps. Bag loose debris instead of dragging it across the ground, because dragging can stir dust and rip existing utility wraps.
Keep an eye on what should stay. Do not pull support blocks, disturb plumbing supports, or knock loose low-voltage wiring while cleaning. The goal is to remove hazards from the soil surface while leaving the house systems alone. When you are unsure about a pipe, wire, or support, stop and get a qualified contractor involved.
Leveling Soil Enough to Protect the Liner
The ground does not need to become smooth like a garage floor. It does need to lose the sharp ridges, deep dips, and raised stones that stress the liner. A garden rake, flat shovel, and patience can do more good here than expensive materials placed over a bad surface.
Low spots deserve special attention. If a depression collects water after storms, mark it before covering it. Filling minor dips with clean soil may help, but recurring water calls for drainage work. Plastic over a hidden puddle does not create a sealed crawl space; it creates a wet pocket with no easy way to dry.
Many homeowners skip this because nobody sees the finished ground. That thinking costs money later. A liner stretched over rough soil gets walked on during inspections, pest treatments, and plumbing work. Smooth enough is not perfection. Smooth enough means the material can survive real life.
Choosing Materials That Match Your Crawl Space Conditions
Material choice is less about buying the thickest roll on the shelf and more about matching the liner to the abuse it will face. A lightly used crawl area under a small home needs one level of protection. A larger area with HVAC equipment, service traffic, and rough soil needs another. Buying cheap plastic once can become buying better plastic twice.
Picking Thickness, Seams, and Wall Coverage
Thin 6-mil plastic can work in limited cases, but many homeowners regret it when service workers crawl across it. Heavier 10-mil, 12-mil, or 20-mil reinforced liners hold up better in spaces that see foot traffic or rough soil. The added cost often feels minor compared with reopening the crawl area later.
Seams need more overlap than people think. A few inches can shift over time, especially when someone crawls across the surface. Aim for wide overlaps, then seal them with compatible seam tape made for the liner material. Duct tape does not belong here. It dries, curls, and gives up.
Wall coverage also matters. Bringing the liner up foundation walls helps block moisture rising from masonry and soil edges. Leave required inspection gaps where local pest rules call for visibility, especially in termite-prone states across the South. Local practice matters more than a one-size answer.
Knowing When Encapsulation Is the Better Move
Some homes need more than ground coverage. If the crawl area has persistent humidity, open vents in a damp climate, ductwork sweating in summer, or repeated mold concerns, encapsulation may make more sense. That usually means sealing vents, covering walls, sealing piers, and controlling air with a dehumidifier or conditioned supply approach.
This does not mean every house needs a premium system. A dry, well-drained crawl area in a mild region may do fine with proper ground coverage. But a Gulf Coast home with warm, wet air pouring through vents all summer may need a sealed crawl space approach to keep humidity under control.
The counterintuitive truth is that ventilation can make some crawl areas wetter, not drier. Warm outdoor air enters, touches cooler surfaces, and drops moisture. That is why older advice about “letting it breathe” does not always fit modern building science. For more general moisture guidance, the EPA’s moisture control resources are worth reviewing before you decide how far to take the upgrade.
Installing, Sealing, and Checking the Finished Barrier
Installation day should feel controlled, not rushed. By now, the space is clean, drainage concerns are addressed, and the right material is ready. This is where neat work pays off. A liner that fits tightly, seals cleanly, and stays anchored will keep doing its job long after the memory of the project fades.
Rolling Plastic Sheeting Under House Framing Correctly
Start at the farthest point from the access door and work backward. This keeps you from crawling across freshly placed material more than necessary. Roll the liner flat, cut around piers with care, and avoid tight cuts that pull open when the material shifts.
Overlap seams generously and tape them after the sheets lie flat. Around support piers, cut clean relief lines, wrap the base, and seal the cuts with compatible tape. Sloppy pier cuts are one of the easiest places for ground vapor to escape, because every pier creates edges and corners.
Run the liner up foundation walls where appropriate and fasten it with masonry anchors, termination strips, or approved adhesive systems. The exact method depends on wall type and local pest inspection expectations. For a homeowner building a broader maintenance plan, pairing this project with a basement waterproofing guide and a home drainage solutions checklist can help keep outside water from undoing inside work.
Testing the Finished Space After the First Rain
The job is not finished when the last seam is taped. The first heavy rain gives you the real inspection. Look for pooled water on top of the liner, open seams, loose wall edges, muddy footprints, and spots where condensation gathers near ducts or pipes.
A sealed crawl space should feel calmer after weather, not trapped and sour. If the air still smells wet, check for missed leaks, open vents, unsealed access doors, or drainage pushing water under the foundation. The liner may be doing its part while another part of the system keeps failing.
Good maintenance is simple. Check the space every spring and fall, and after major storms. Keep pest technicians, plumbers, and HVAC workers from tearing the liner during service. Ask them to report damage if they see it. One small repair made early beats a hidden tear that feeds foundation moisture problems for months.
Conclusion
The best crawl area repairs do not call attention to themselves. They work quietly below your floors, cutting moisture at the source and making the house feel steadier from season to season. That is the value of doing the slow parts right: clearing, grading, sealing, anchoring, and checking instead of rushing to cover dirt with plastic.
A vapor barrier is not magic, and it should never be treated like a shortcut around drainage, leaks, or bad grading. It is one strong part of a larger moisture plan. When you respect that, you protect flooring, framing, insulation, indoor air, and resale confidence in one move.
Before you buy materials, inspect the crawl area with a clear head and a bright light. Fix what brings water in, choose material that can survive service traffic, and seal every seam like it matters. Because it does.
Take the time to do the job with discipline now, and your home will repay you every time the weather turns wet.
Frequently Asked Questions
How much overlap is needed for crawl space liner seams?
Most crawl space liner seams should overlap by at least 6 to 12 inches before taping. Wider overlap gives the material more room to stay sealed when someone crawls across it later. Use tape made for the liner, not common household tape.
What thickness plastic is best for crawl space moisture control?
A 10-mil to 20-mil reinforced liner works well for many homes, especially where service workers may crawl over it. Thin 6-mil plastic can tear faster on rough soil. Heavier material costs more upfront but often lasts longer.
Should crawl space walls be covered with plastic too?
Covering the walls often improves moisture control because masonry can pass dampness into the space. Leave any required termite inspection gap where local rules or pest professionals recommend it. Wall coverage works best when seams and edges are sealed.
Can plastic sheeting under house framing stop mold?
It can reduce one major moisture source, but it cannot remove mold that already exists or fix leaks, poor drainage, or humid outdoor air. Mold control usually needs moisture reduction, cleanup, and better air management working together.
Do I need a dehumidifier after crawl space sealing?
Some sealed crawl areas need a dehumidifier, especially in humid U.S. regions or homes with ductwork below the floor. A humidity monitor helps you decide. If readings stay high after sealing, mechanical drying may be the missing piece.
Should crawl space vents stay open after installing a ground liner?
That depends on climate, building design, and whether the space is being encapsulated. In humid regions, open vents can bring in wet air and make conditions worse. Ask a local crawl space or building professional before sealing vents permanently.
How often should a sealed crawl space be inspected?
Check it at least twice a year and after major storms. Look for open seams, tears, water on top of the liner, pest damage, and loose wall edges. Regular checks keep small problems from becoming expensive structural repairs.
Can homeowners install crawl space liner without hiring a contractor?
Many homeowners can handle simple ground coverage if the space is dry, accessible, and free from major hazards. Hire help when there is standing water, mold, damaged framing, electrical risk, heavy debris, or uncertainty about drainage and termite inspection rules.